Coffee Filter Flowers

Hi!  I finally got around to making a coffee filter flowers, and ended up creating a wreath, using orange, turquoise and green flowers.  Of course I don’t have a picture of the wreath, but it is hanging on my front door.

Super easy supplies coffee filters, food coloring and a container.

Coffee Filter Wreath

First step is to add the food coloring to water in the container. Overall, I did wish I use more coloring, the final dried result ended up a little more pastel than I was looking for, but still got the job done.

Coffee Filter Wreath

I actually placed all the filters in at once, no need to do one at a time or a few at a time. The package was 200 total, I think, I used one layer which was about 50 filters…I think. I guess I should’ve verified that first.

Coffee Filter Wreath

The coloring will slowly be absorbed by the filters, no need to touch, move, flip or anything with them.

Coffee Filter Wreath

Once the color was absorbed all the way, I took them out and started separating.  This is the most time consuming part. You don’t want to separate them too early, as they would tear, so it was little by little as they started to dry out.

Coffee Filter Wreath

You can tell my kitchen was tied up a bit, no oven/stove use here!

Coffee Filter Wreath

Once they were dried, you can place them in a pile of 4-5 filters each. Depending on how thick you want the flowers or how many. I did stacks of 5, which gave me 10 flowers for each color.

Now for the fun part. This is so easy, I was surprised it took me so long to try these. 1. stacks of 5  (2. fold in half (3. fold in half again (4. stample the end, as close to the bottom as you can and then cut a scallop design on top.

Coffee Filter Wreath

Once that is done (1. open the filters and lay as flat as possible (2. start with the inside, and pull up on the first filter, scrunching together (3. move to the next filter, repeat (4. final flower complete

Coffee Filter Wreath

As I said, this was super easy, a little more pastel than I wanted, but still worked out.  I’ve seen these used for parties as bouquets/centerpieces, wrapped around a Christmas tree as garland. I think they have a great carnation feel to them, just bigger! Pinterest is great for ideas on how to use these.

On to my next craft.

Paint Chip Wreath

I had originally saw this project here, and really liked the idea and colors behind it, but decided to go with Christmas colors instead. This was one of the projects that really was not that easy for me. I would eventually like to try it again, maybe the 2nd time would be the charm.

I grabbed quite a few paint chips from our local hardware store. I’m sure they woudn’t mind.

Paint Chip Wreath

Then started to fold and cut. I didn’t make a template, just eyed it and cut a leaft shape, or what I thought was a leaf.

Paint Chip Wreath

Once I had the leaves cut I laid them out in a circle to determine what color flow I liked best.

Paint Chip Wreath

Paint Chip Wreath

The instructions called to take 3 of the paint chips and put them in a row and start gluing from there. I don’t know why, but I had a hard time making sure this seemed “full” enough and flowed in a circle. Plus working on the wire frame and trying to glue to it, wasn’t as easy as it sounds to me.

Paint Chip Wreath

Paint Chip Wreath

I didn’t come out horrible and I did keep it hung up for the holiday season. I might have to try again, but we’ll see.

Paint Chip Wreath

Overall it was a fairly enexpensive project and kept me busy.


Painted Feathers

I would like to know where the time has gone. I’ve been busy working and crafting, but didn’t realize how long it’s been since I’ve posted.  My poor blog has been lonely, I’m sure of it.  Anyway, I’ve been up to my arms in Pinterest ideas, and here is another one that I decided to tackle.

Feather Paining, it’s all the rage.

painted_feathers_001

I went with Fall colors, since this was used as my Thanksgiving table. Yes I said it, this is from November, nothing like posting on “time”. This was actually pretty easy and a great way to add creative color. The original pinterest post, you find it here, actually painted white feathers. I used colored feathers and skipped that step. Although the water color look, I really like, so I might tackle this one again.

painted_feathers_003

painted_feathers_002

I used them to decorate vases and water glasses for the kids.

painted_feathers_004

painted_feathers_005

I’ll try to post more and more often, we’ll see how that goes.

Fiona Dress with Michael Miller Fabric

I don’t know about you, but the past 2 months flew by, I’m still trying to figure out what happened to them.

Every Thanksgiving, I make a new dress for my daughter. I usually use a simple knot dress pattern, but decided to go out on a limb and test my sewing skills. I fell in love with this pattern, and after completing this dress, I’m so glad I did! I bought the pattern at Fabricworm and picked up Michael Miller fabric from my local fabric store, Quilt Crossing.

Fiona Dress Michael Miller Deer

I cut everything out and then set to work on assembling and sewing.

Fiona Dress Michael Miller Deer

Working on the bodice and adding the buttons and loops.

Fiona Dress Michael Miller DeerSkirt gathering. Isn’t the deer so dear!

Fiona Dress Michael Miller DeerAdding the tie to the back. I love the big orange bow in the back.

Fiona Dress Michael Miller DeerOverall turned out so great! At least in my opinion.

Fiona Dress Michael Miller Deer

Fiona Dress Michael Miller Deer

Doesn’t hurt that it matches my daughter’s room so nicely too.

Fiona Dress Michael Miller Deer

Off to another project!


Restroom Sign made from Pallet – Pinterest Inspired

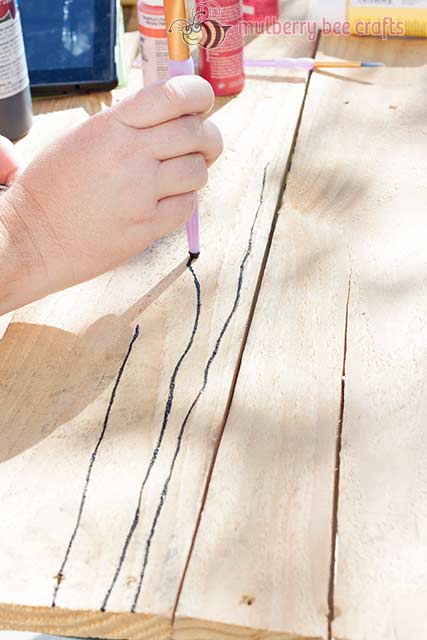
Here I am with another pallet sign. You know when you have one pallet, with a lot of wood to work with, might as well use it. I saw this one on Pinterest also, and decided it would be easy. My husband put together the first pallet sign and this one too. I printed a man and woman restroom sign and traced on the pallet. (don’t mind the allergy medicine bottle in the picture 🙂 )

Pinterest Pallet Restroom Sign

This time I used a sealer for the paint. I thought since I was using a chalkboard paint, that the sealer would help to even out the paint, which it did, nicely!

Pinterest Pallet Restroom SignOnce the sealer was dry, which is really quick, I painted the figures. I did use a Martha Stewart chalkboard paint, in taupe, that I had handy. I think next time, I will use a darker paint that will stand out on the pallet better.

Pinterest Pallet Restroom Sign

Once it was dry, I gave it away, so I will definitely need to make another one for myself. This was a super easy Pinterest idea.

Pinterest Pallet Restroom Sign

I’m on to my next Pinterest Inspired craft.  If you are interested in the actual Pinterest link that I used, you can take a look at my Pinterest page here. Happy Crafting!


Watercolor Poppy on a Wood Pallet

I have been using Pinterest to save my favorite craft items, and realized, I save and never do. I am starting to change that. I am a blog follower, from party ideas to photography to crafts. Lately it seems that pallets are the “new” thing. They’re usually free, so why not take advantage of that.

pinterest pallet watercolor poppy

I recruited my husband for the first phase. Taking apart the pallet and cutting it down to the size I needed. Gluing.

pinterest pallet watercolor poppy


And hammering into place.

pinterest pallet watercolor poppy

This is the inspiration. I love the simpleness and the pop of color.

pinterest pallet watercolor poppy

One simple tip I like to give, if you need a “circle” or dot design, use the end of the paint brush. Simply dip it in paint, and dab your piece. Easy!

pinterest pallet watercolor poppy

I had painted the stems, but decided that they were way too thin for the size of the canvas, so I went back and thickened them up a bit.

pinterest pallet watercolor poppy

I used simply acrylic paints, that are inexpensive and can be found at your craft store.

pinterest pallet watercolor poppy


The stem placement made me a bit nervous. I wanted to make sure that how I painted the stems, the flower tops would make sense.

pinterest pallet watercolor poppy


Once I had the stems painted, I mixed a few colors to find the perfect red. Using a bit of white and black to either lighten or darken your base, will give you the perfect color flow.

pinterest pallet watercolor poppyThe final result. I actually did this for a very good friend of mine. She has it hanging on her patio, so I need to make myself a matching one. I didn’t paint on a clear varnish, I was too excited to give this to her, but her husband was awesome and painted on a clear coat. Very important since it is hanging outdoors.

pinterest pallet watercolor poppy

Off to my next project, expect to see more from my Pinterest Files!


Barstool Refinishing

We were in the need for some barstools, and because I’m cheap, we hit up a few garage sales. We got a great deal on these, $15 for the two! I’m not the type to try to bargain, I normally just pay what the person is asking, so if you see me coming, raise the price!

barstool refinish

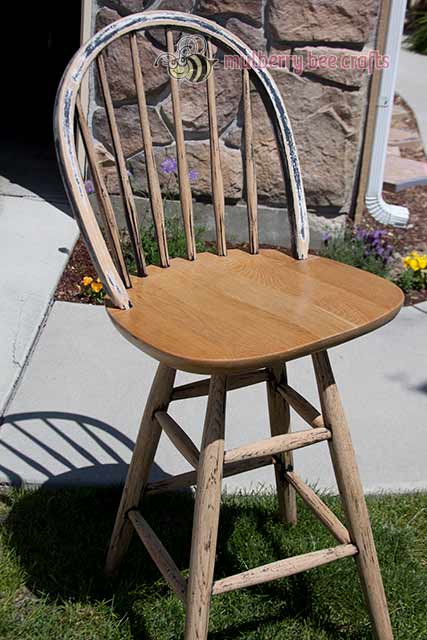
They needed a bit of work though, which is what I was expecting.  I started by sanding down the backs and legs.

barstool refinish

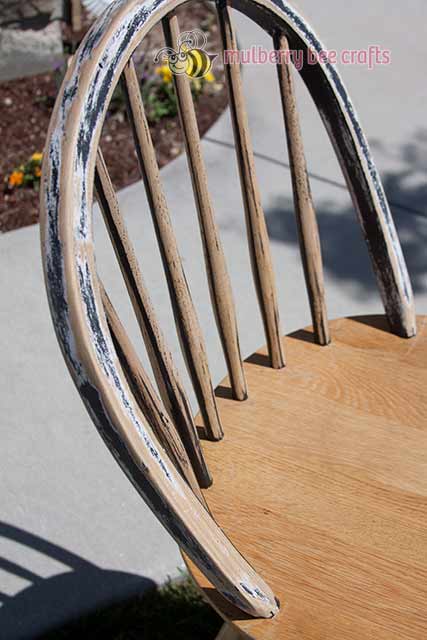
After about an hours worth of work and a ton of black dust, they were done.

barstool refinish

A little closer view, I wasn’t perfect with removing everything because I knew I was going to prime them. I also kept the seat as is, no need to sand anymore than is needed.

barstool refinish

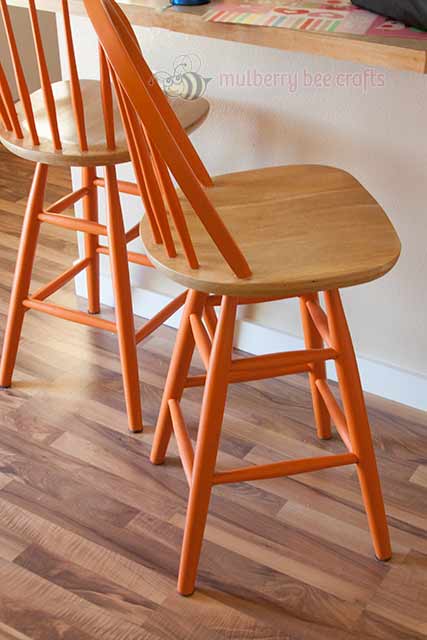
I taped off the bottom of the backs, where the posts meet the seat. A little priming action. (we were in the middle of moving…again…so I didn’t get any pictures of the actual paint going on)

barstool refinishThe end result.

barstool refinish

Ignore the mess on the counter, I wish I could say, it looks much better now, but we all know the truth.

barstool refinish

Off to my next craft.


Colorful Spray Paint Frames

This is an easy craft to do, that has a big impact. I had a few black and silver frames that were not being used, so I updated them to fit my daughter’s room scheme. I took out the backs and glass and just used the actual frame.
Spray Paint Frames

I picked out 3 spray paint colors that fit the room colors. I used an empty cardboard box (Costco comes in handy) to contain the spray paint.

Spray Paint Frames

Lime green, turquoise, and pink!

Spray Paint Frames

Super easy, super cute!  Hung them up and added a few accent pieces. Love!

Spray Paint Frames

Off to my next project!

Tatami Mat Quilt 4 – the Final Product

I really am happy with how this all turned out, and I know Baby H will be happy to have this quilt.

Tatami Mat Quilt

The white background really helps to make the pattern pop.

Tatami Mat Quilt


And the backing is so soft and cuddly, perfect for baby!

Tatami Mat Quilt

Again, I hand stitched the binding.

Tatami Mat Quilt

Wrapped up and ready for use!

Tatami Mat Quilt


Tatami Mat Quilt Part 3

I don’t think I’ve ever shared how I “pad” the quilt. I don’t use pins at all, instead I use a spray adhesive.

Tatami Mat Quilt

I’ll lay out the backing first (back up of course), then the batting, then the quilt top.

Tatami Mat Quilt

The amount of backing will drive me crazy sometimes, I hate having so much left over. This backing I didn’t mind so much, I was able to make some cute “lovies” for baby H.

Tatami Mat Quilt

This is the adhesive spray I’ve been using, it’s stickier than most, but it works for now. I also wish I had my table back. Having to layout the quilt on the floor is annoying.  It’s tough to get the wrinkles out but it’s important to lay out your quilt so you can make sure it’s ‘square’.

Tatami Mat Quilt

The backing is Minky fabric. Super soft, perfect for a baby blanket!