Tatami Mat Quilt 4 – the Final Product

I really am happy with how this all turned out, and I know Baby H will be happy to have this quilt.

Tatami Mat Quilt

The white background really helps to make the pattern pop.

Tatami Mat Quilt


And the backing is so soft and cuddly, perfect for baby!

Tatami Mat Quilt

Again, I hand stitched the binding.

Tatami Mat Quilt

Wrapped up and ready for use!

Tatami Mat Quilt


Tatami Mat Quilt Part 3

I don’t think I’ve ever shared how I “pad” the quilt. I don’t use pins at all, instead I use a spray adhesive.

Tatami Mat Quilt

I’ll lay out the backing first (back up of course), then the batting, then the quilt top.

Tatami Mat Quilt

The amount of backing will drive me crazy sometimes, I hate having so much left over. This backing I didn’t mind so much, I was able to make some cute “lovies” for baby H.

Tatami Mat Quilt

This is the adhesive spray I’ve been using, it’s stickier than most, but it works for now. I also wish I had my table back. Having to layout the quilt on the floor is annoying.  It’s tough to get the wrinkles out but it’s important to lay out your quilt so you can make sure it’s ‘square’.

Tatami Mat Quilt

The backing is Minky fabric. Super soft, perfect for a baby blanket!

Tatami Mat Quilt Part 2

The best part for me, is laying out the quilt and getting an idea on how it will look.

Tatami Mat Quilt

You just know, you’re almost done.

Tatami Mat Quilt

The next step, there was a slight error. I worked on making sure that the side matched up, but the two rows in the middle were off a bit, so I had to take out the stitching and redo.

Tatami Mat Quilt

That ended up being an easy fix though. I love how the white highlights the other material. I actually just bought some more so I can do another one with the same pattern, but bigger. In the meantime, I’ll be working on finishing this one though. Wait til you see the backing!!

Tatami Mat Quilt

This quilt is for my cousin and his wife who are expecting their first baby in July…a girl! I can’t wait to meet Miss Harper Rose!

I didn’t want to do a traditional pink and white quilt. Theyare such a fun family and love the beach, that I wanted to go with a beach-tropical feel. I picked up this bundle at fabricworm, of course.

Tatami Mat Quilt

I love the turquoise and blues with a few corals and pinks thrown in.

Tatami Mat Quilt

This quilt pattern had a lot of white, which really helps the colors really stand out. I’ve had my eye on this pattern for quite awhile, and I’ll be using this again soon for another quilt. You can find it here for an immediate download, which I love!

Tatami Mat Quilt

There was a lot of cutting of the same sizes. I felt like I was in a sea of white for a bit. The hardest part, which really wasn’t that difficult, was actually making sure each “square” was different. I didn’t want to duplicate patterns.

Tatami Mat Quilt

I arranged all the squares together before I actually started sewing, this way I could be sure they were all different. I had a few changes to make along the way, so I did save a lot of time by doing this.

More pictures to come soon, this was a fun one and turned out awesome!

The final product – Enchant Fabric

I had my friend snap a few pics and send me the final product. I sent it without thinking about taking a few pictures.

Enchant Fabric Happy Hour Quilt

I decided to sew it so it looks like the colors bleed from one to another. Not sure if it actually worked, but I love the final result either way.

Enchant Fabric Happy Hour Quilt

I used a simple white on the back and created a small section with left over fabric. Maybe my new favorite thing to do.

Enchant Fabric Happy Hour Quilt

I used turquoise and coral thread so you can really see the detail of the stitching.

Enchant Fabric Happy Hour Quilt

I’m working on a new quilt, so I should a new project to post soon.

Tea Party Quilt Continues

I tried to keep this pretty simple and cute.

Enchant Fabric Happy Hour Quilt

I think the fabric colors and design speak for themselves.

Enchant Fabric Happy Hour Quilt

Basically you have three layers to make one block. I like how the center square really pops out on these blocks.

Enchant Fabric Happy Hour Quilt

I did forget to take pictures of my layout complete before I sewed it all together, but the overall pictures will make up for it. I was rushing to get the quilt done and mailed out.

Tea Party Quilt

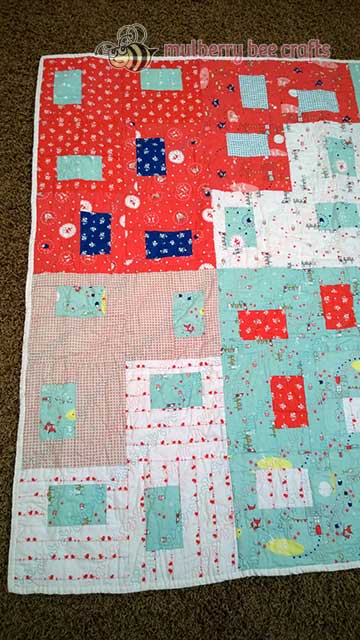
This quilt is not only super cute (yes I almost kept the fabric) but it is very near and dear to me. One of my very dearest friends just had a baby girl (Hi Aviana!) and this quilt is for her. I purchased the pink and navy blue fat quarter bundle from fabricworm….remind me to buy stock in this company. I’ve had this Happy Hour book for quite some time, the place I bought it from is no longer in business, but you can find it here: Create For Less, this is my third quilt from this book, so definitely a good purchase!

Enchant Fabric Happy Hour Quilt

I mean, really, the deer color chart! It was so cute how could I not share it. Again, if you missed one of my tips before, if you’re looking for coordinating fabric, the guide is always a good one to take to the store with you.

Enchant Fabric Happy Hour Quilt

The cutting is pretty basic, but there is a lot of it. The main idea behind this book is that it can be done in an hour. Well if that is all you are working on, I guess you could do it. Not sure if it accounts for ironing and tv watching, in the middle of it all.

Enchant Fabric Happy Hour Quilt

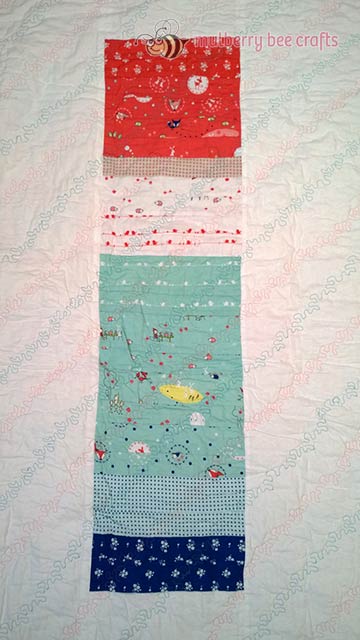
I mean really! This fabric! The little girl having tea with her animal friends, birds on a wire, tree houses, all of in one product line!

Enchant Fabric Happy Hour Quilt

Seems like it’s babyville all around! I’m busy, busy, busy, but it’s fun! Between my full time job, and my fun crafting “job”, circles are being ran!


A Walk in the Park

This fabric can’t become available soon enough.  Isn’t it sweet?

Bluebird Park by Kate and Birdie Paper Co.

This is just a small peek. Head over to Fabric Worm to see it in all it’s glory! Seriously between the bikes, balloons, hedge hogs, bunnies, humming birds…I don’t know what cuter. Don’t get me started on the color scheme. Well played Kate & Birdie Paper Co., well played!

And that’s what it’s all about!

I pieced together the quilt and got an idea of the layout. The instructions specifically said not to line up seams, which made for a few changes.

Big Sur Hokey Pokey Quilt

Once I started sewing the panels together, I realized I didn’t do it right. Instead of making sure the smaller points were next to each other, and the larger ones too, I just sewed them together. About 3 panels in, I finally caught on and had to start again.

Big Sur Hokey Pokey Quilt

But overall pretty successful! Here it is from another angle.

Big Sur Hokey Pokey Quilt

I’m actually going to turn this into a UFO. It’s measuring 44 1/2″ x 54″, which is a decent throw size. (I didn’t use the full amount of fat quarters the pattern called for, since I purchased the pattern after I bought the fabric) I’m debating if it needs a border. Sometimes I need to step away from a project to make my decision.

Big Sur Hokey Pokey Quilt

I have a few more projects on the horizon. Some are quilts and some are just sewing projects. I’m on a fabric kick lately.

Hokey Pokey…turned myself around

This is by far the most difficult quilt to date. I have my fingers crossed that it’s going to come out even. Trying to cut at an angle and then sew back together, to cut again…whew! Once you cut your fabric, you match them up again using different patterns, then sew those together.

Big Sur Hokey Pokey Quilt


You then cut that rectangle into thirds. Then cut in half at an angle.

Big Sur Hokey Pokey Quilt

Then you sew back together using different patterns and making sure you don’t match up seams.

Big Sur Hokey Pokey Quilt

You’ll have these rectangles.  Once you get that, you need to go back and cut everything down a bit, and make sure it’s square. I just hope it looks good in the end, that’s where I’m at now.